To allow the vendor to view open moves or closed moves within a given time period, accept or decline moves offered by Dispatch, and review the status of deadhead movements.
Invoked by <File><View><Move List> on the TMS Remote User Interface screen.
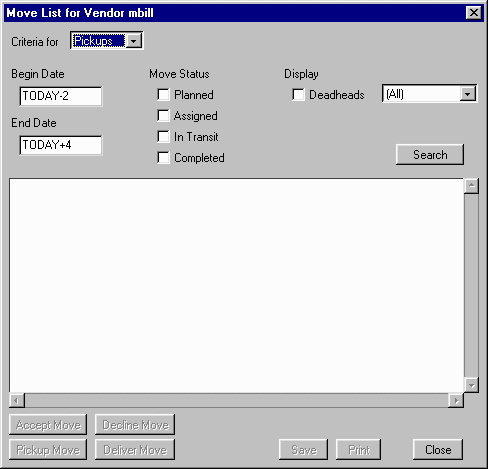
Invoked by pressing the Move List iconic button on the TMS Remote User Interface screen.
Invoked by the Deadhead Button on the Process Deadhead screen.
Invoked by the Move Button on the Move Pickup/Delivery screen.
Invoked by the Load Button on the Load Details screen.
Grid Contents - The following fields are displayed on both pickup, delivery and OTR moves:
Move ID - Which is the load number (dash) move number. Ex: 90953001-3.
Move Status - Possible values:
Planned
Assigned
Docked (at origin)
Intransit
Arrived (at destination)
Complete
Approved/Paid
Equipment Number
Equipment Current Location (City/St)
Tractor
Move Origin number/name/city/state
The following columns are also displayed when viewing origin moves:
Appointment Begin date/time
Appointment End date/time
Move Destination number/name/city/state
Rail Cutoff date/time
Final Destination number/name/city/state
Postal Contract number
Miles
Load Type
Deadhead Status
Cost
OTRs will display the same columns as for origin moves except the rail information will be removed.
The following columns are also displayed when viewing destination moves:
Rail Pickup number
Estimated Rail Grounding
date/time
Flag indicating load
has been grounded
Move Destination number/name/city/state
Appointment Begin date/time
Appointment End date/time
Postal Contract number
Miles
Load Type
Deadhead Status
Cost
Criteria For
This drop down list describes the type of moves to select. Available options are Pickups, Deliveries, and OTR.
Begin Date
Allows entry of the start of the date range to search. The field will accept a standard date or the keyword TODAY. When using the keyword, the user can also specify an offset such as TODAY+4 or TODAY-2.
End Date
Allows entry of the end of the date range to search. The field will accept a standard date or the keyword TODAY. When using the keyword, the user can also specify an offset such as TODAY+4 or TODAY-2.
Move Status
Allows the user to further restrict the load search to only moves of particular statuses. If no status is selected, then all statuses will be returned. If the completed status is checked, then begin and end dates are required.
Display Deadheads
Checking this box will cause the system to return both loaded and empty movements if All is selected as the Payment Status. If the box is checked and any Payment Status other than All is selected, only the empty movements of the specified Payment Status will be shown. If this box is not chceked, only loaded movements will be displayed.
Empty Move Payment Status Dropdown
This dropdown can be used to restrict the type of deadheads to be displayed in the grid. Available options are: All, Approved, Denied, and Not Reviewed. A date range is not required when searching for Not Reviewed entries.
Search Button
Press this button after selecting your criteria. The results will be displayed in the grid below. Pressing <Enter> anywhere on the screen has the same effect.
Accept Load Button
When a move is in Planned status, the vendor must signify that they are willing to perform the move. Highlight the desired move in the grid and press this button. The move status will change from Planned to Assigned. A block of moves can be highlighted at one time and accepted as one transaction.
Decline Load Button
If the vendor does not want to perform a move that is in Planned status, highlight the desired move in the grid and press this button. The move status will change from Planned to Unassigned, and a message will be sent to Dispatch. A block of moves can be highlighted at one time and declined as one transaction.
Pickup Load Button
Invokes the Move Pickup/Delivery screen to process the currently highlighted move.
Deliver Load Button
Invokes the Move Pickup/Delivery screen to process the currently highlighted move.
Select Button
After a query has completed and results displayed in the grid, highlight the line of the desired location and press this button. The lookup screen will close and the location information will be returned to the original window. Double clicking on a grid row will also trigger the selection process. This button is only accessible when the screen is invoked from another screen and not the menu.
Save Button
Saves the contents of the grid to a file. The first line of the file is column headings, with subsequent lines, the rows of data. Data fields within each row are pipe ( | ) delimited.
Print Button
Generates a formatted report of the contents of the grid.
Close Button
Closes the Move List window. Pressing <Esc> anywhere on the screen has the same effect.
TMS Web Functional Design
Version 2.0.1, revised 08/04/2004
Copyright © 1999-2004 TransWorks